How to Use OpenPose with ControlNet in Stable Diffusion
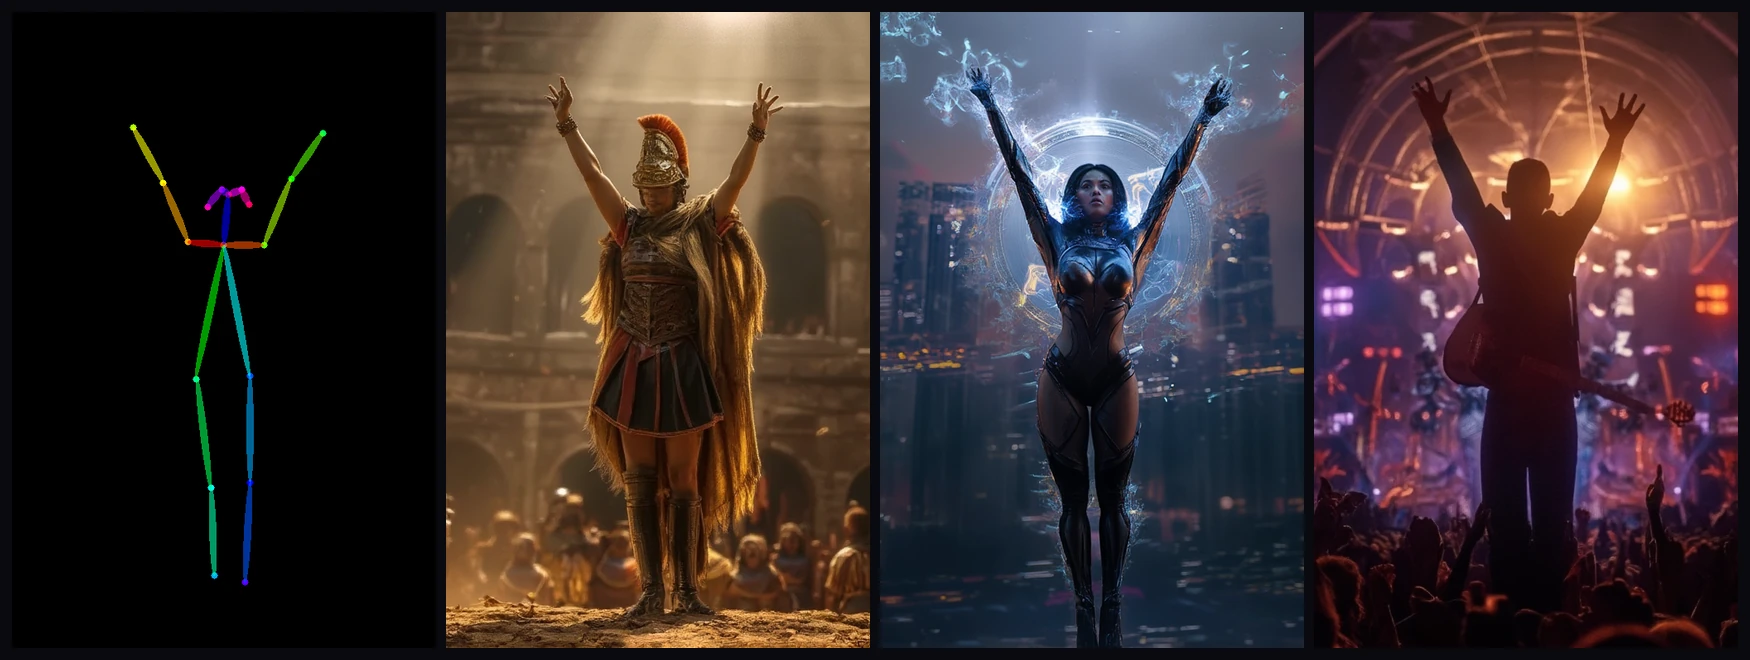
You can describe a character perfectly and still get a different pose on every seed. Arms crossed, then arms out, then a three-quarter turn you did not ask for. Prompting alone gambles on composition. OpenPose ControlNet lets you stop gambling: you hand Stable Diffusion a pose skeleton, and it builds your character into that exact pose.
Here is the whole idea in one picture. Left: a reference photo. Middle: the OpenPose skeleton extracted from it. Right: a brand-new character generated in that exact pose.
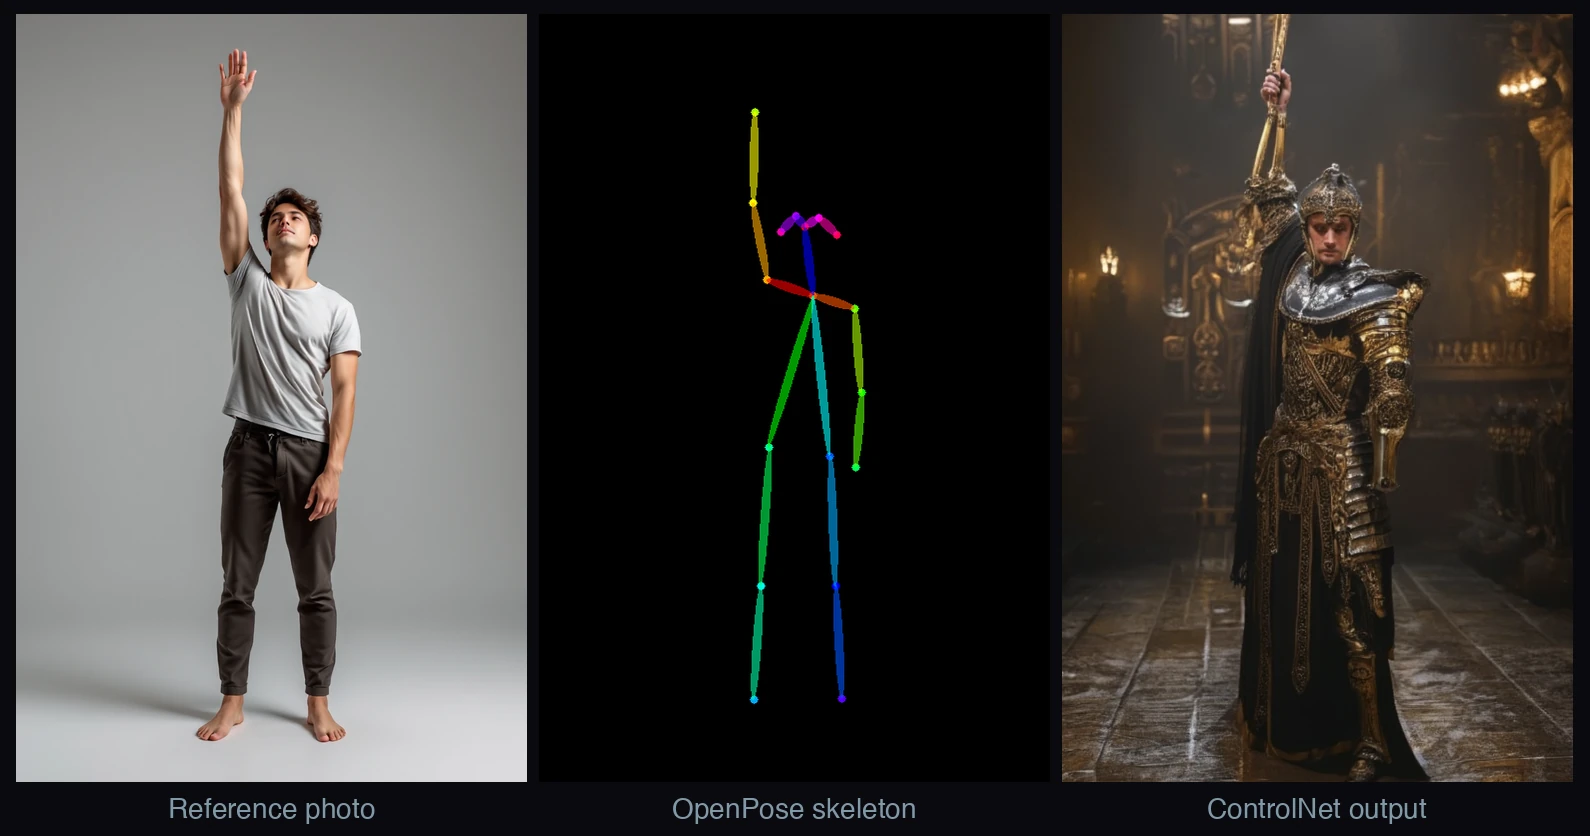
Nothing about the knight is in the photo. The armor, the castle, the raised sword all came from the prompt. The one thing that carried over was the pose, because the skeleton, not the words, controlled it.
What is OpenPose ControlNet?
OpenPose is pose detection: it looks at a human figure and reduces it to a skeleton of keypoints, the head, shoulders, elbows, wrists, hips, knees, and ankles, connected by limb bones. ControlNet is an add-on to Stable Diffusion that conditions generation on an extra input beyond the prompt. Put them together and the extra input is that pose skeleton.
The result is a clean division of labor. The skeleton fixes the pose. The prompt controls identity, clothing, style, and background. You can regenerate a hundred variations, and every one of them stands exactly the way the skeleton says, the same way a LoRA locks a character or style while the rest of the prompt stays free.
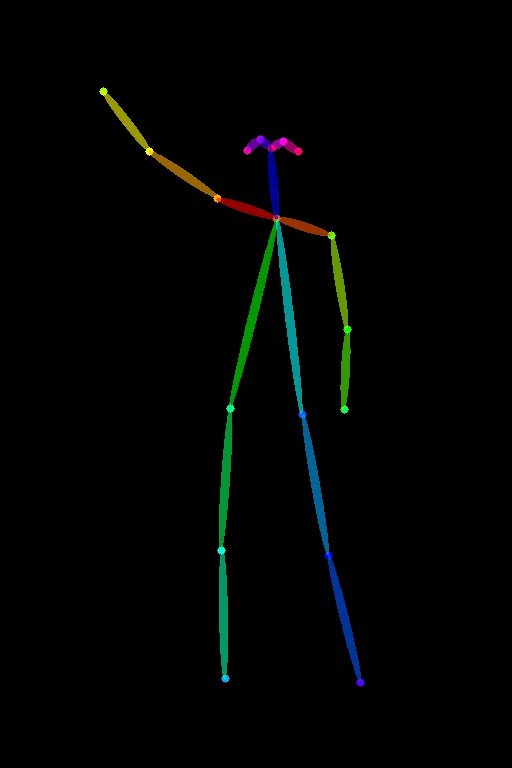
That skeleton is the whole mechanism, so it is worth knowing it on sight. It is a "control map": a spare, colored stick figure on black, one dot per joint.
The preprocessor vs the model (the part everyone trips on)
The single most common source of confusion is that "OpenPose" names two different things that work together.
- The preprocessor (also called the annotator) is what makes the skeleton. It looks at your reference image and produces the control map.
openposegives you the body;openpose_fulladds hands and face;openpose_handadds hands; the newerdw_openpose_fulldetects more accurately. - The model is the ControlNet weights that teach Stable Diffusion how to turn that skeleton into an image. This is the file you download.
You need a matching pair: a preprocessor to build the control map, and a model to condition on it. The rule: the model must match your base checkpoint. An SD1.5 OpenPose model will not steer an SDXL checkpoint, or vice versa. If you already have a skeleton image, set the preprocessor to none and feed it straight to the model.
How do I use OpenPose with ControlNet?
First, get the two pieces:
- Install ControlNet. In Automatic1111, open Extensions, Install from URL, and paste the ControlNet extension repo (github.com/Mikubill/sd-webui-controlnet), then restart. In ComfyUI, install the ControlNet auxiliary preprocessors (the
comfyui_controlnet_auxnodes); ComfyUI applies a ControlNet model already, but the OpenPose preprocessor ships separately. - Download the OpenPose model. For SD1.5, lllyasviel's control_v11p_sd15_openpose is the standard;
control_v11p_sd15_openpose_fp16.safetensorsis a smaller half-precision version. For SDXL, use an SDXL model such as thibaud'scontrolnet-openpose-sdxl-1.0. Drop it instable-diffusion-webui/models/ControlNetorComfyUI/models/controlnetand refresh.
Then run it. In Automatic1111, open the ControlNet panel and upload a reference (or a drawn pose). Check Enable and Pixel Perfect, set Preprocessor to openpose (or openpose_full for hands and face) and Model to the one you downloaded, keep Control Weight near 1.0, and generate. The output matches the skeleton it detects.
In ComfyUI, the graph is Load Image, into an OpenPose preprocessor node, into Apply ControlNet with the OpenPose model loaded, into your KSampler alongside the prompt. Same logic, wired instead of clicked.
No reference photo? Use an OpenPose editor to pose a skeleton by hand, or grab a ready-made one from a pose library like OpenPoses and feed it straight in. Either way you skip the photo hunt entirely.
A small cookbook: recipes to try
The point of pose control is that once you have a skeleton you like, the prompt is a free variable. One pose, any character. Two recipes to show it.
Recipe 1: one pose, three characters
Take the arm-raised skeleton from the top of this post and run it with three different prompts. Same skeleton, same stance, three unrelated characters.
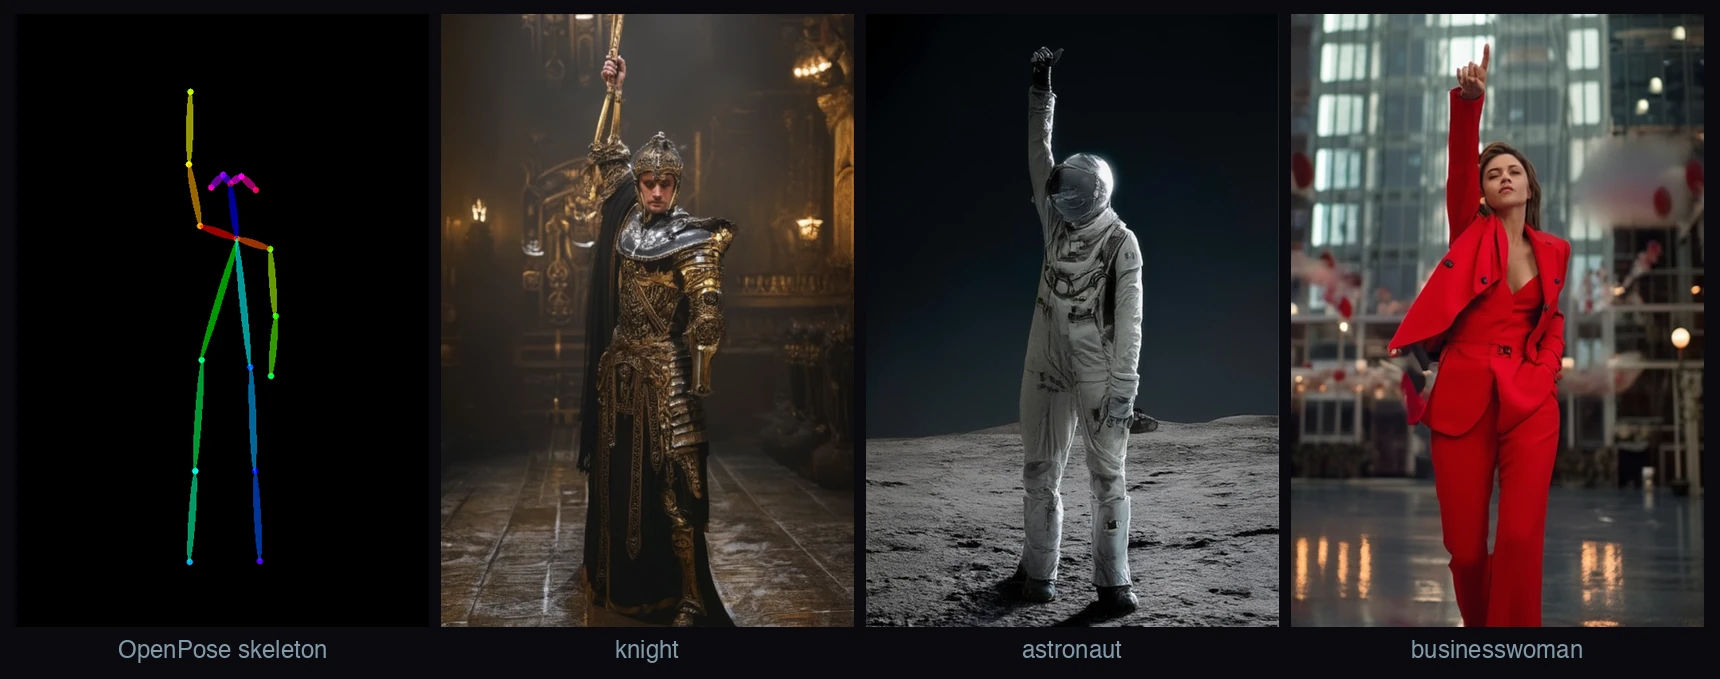
Only the prompt changed:
- The knight:
a medieval knight in ornate polished steel armor, full body, standing in a castle courtyard, cinematic lighting, highly detailed - The astronaut:
an astronaut in a white spacesuit standing on the surface of the moon, earth in the black sky, cinematic lighting, highly detailed - The executive:
a confident businesswoman in a tailored bright red suit, modern glass office atrium, professional editorial photograph, highly detailed
Keep Control Weight near 1.0 and swap only the prompt. Change the character, keep the stance.
Recipe 2: the same trick, a harder pose
The arm-raised stance was easy. Seated poses are where control earns its keep: limbs fold and overlap, and a prompt alone almost never nails "sitting" cleanly. Same method as Recipe 1, one skeleton and three prompts, but now a seated pose.
To get a seated skeleton you have two easy routes. Grab one from a pose library like OpenPoses and drop it into a local ControlNet run with the preprocessor set to none. Or generate a quick reference in the pose and let the model extract the skeleton, which is what we did here.
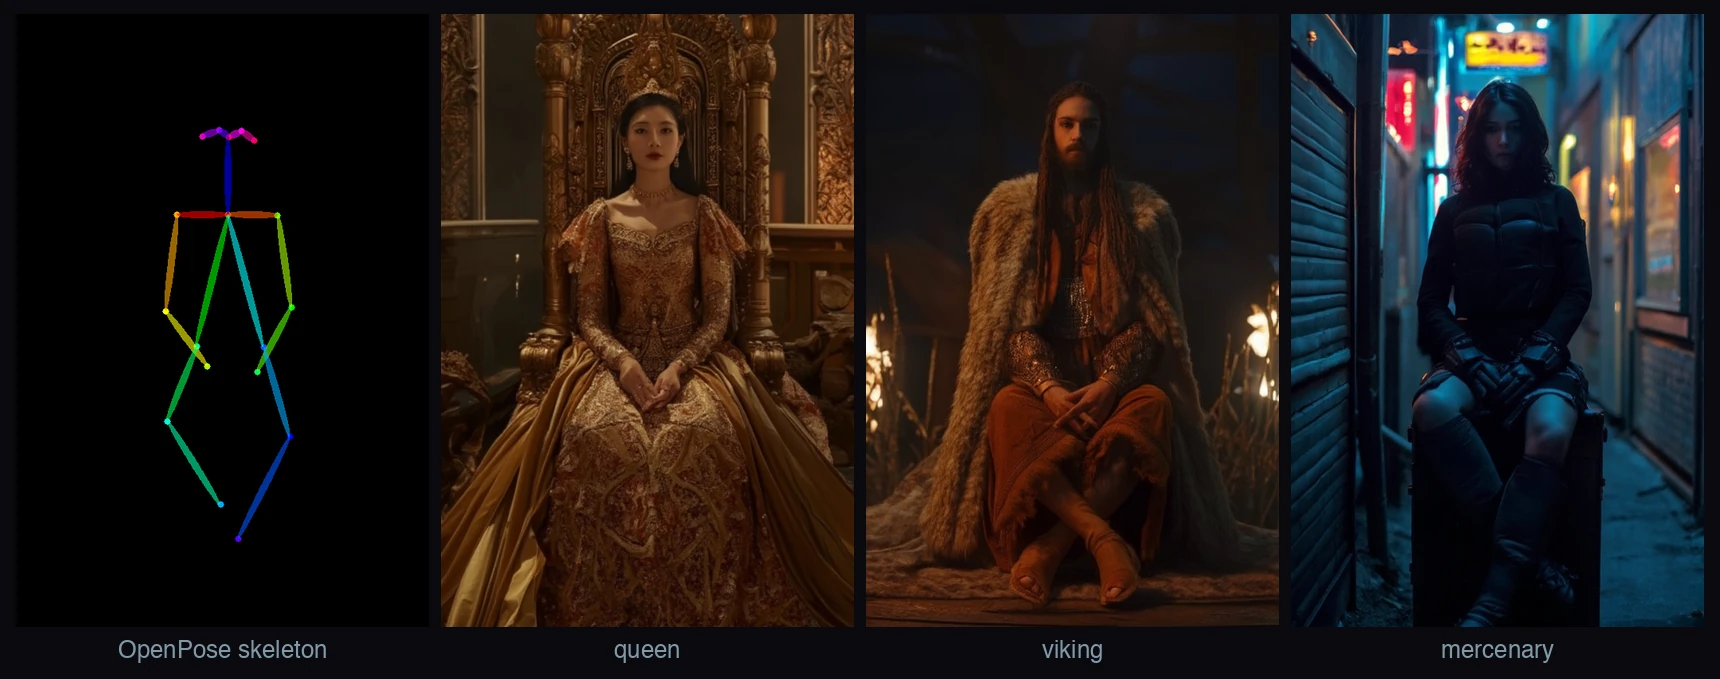
Only the prompt changed:
- The queen:
a regal queen in an ornate jeweled gown, seated, palace throne hall, cinematic lighting, highly detailed - The viking:
a battle-worn viking warrior with fur cloak and braided beard, seated, torchlit longhouse, cinematic, highly detailed - The mercenary:
a cyberpunk mercenary in tactical armor, seated, neon-lit alley at night, cinematic, highly detailed
That one habit, fix the pose and vary everything else, is most of what makes pose control useful: consistent composition across a set, a character sheet in a single stance, a storyboard where every frame frames the same way.
How much control weight should you use?
One dial decides how strictly the skeleton is enforced: the control weight (some tools call it control strength). Set it too low and the pose slips. Set it too high and it over-constrains the image, so color and contrast start to drift. There is a sweet spot, and it is worth finding.
Here is the same skeleton and the same seed run across three prompts, with only the control weight changing from left to right.
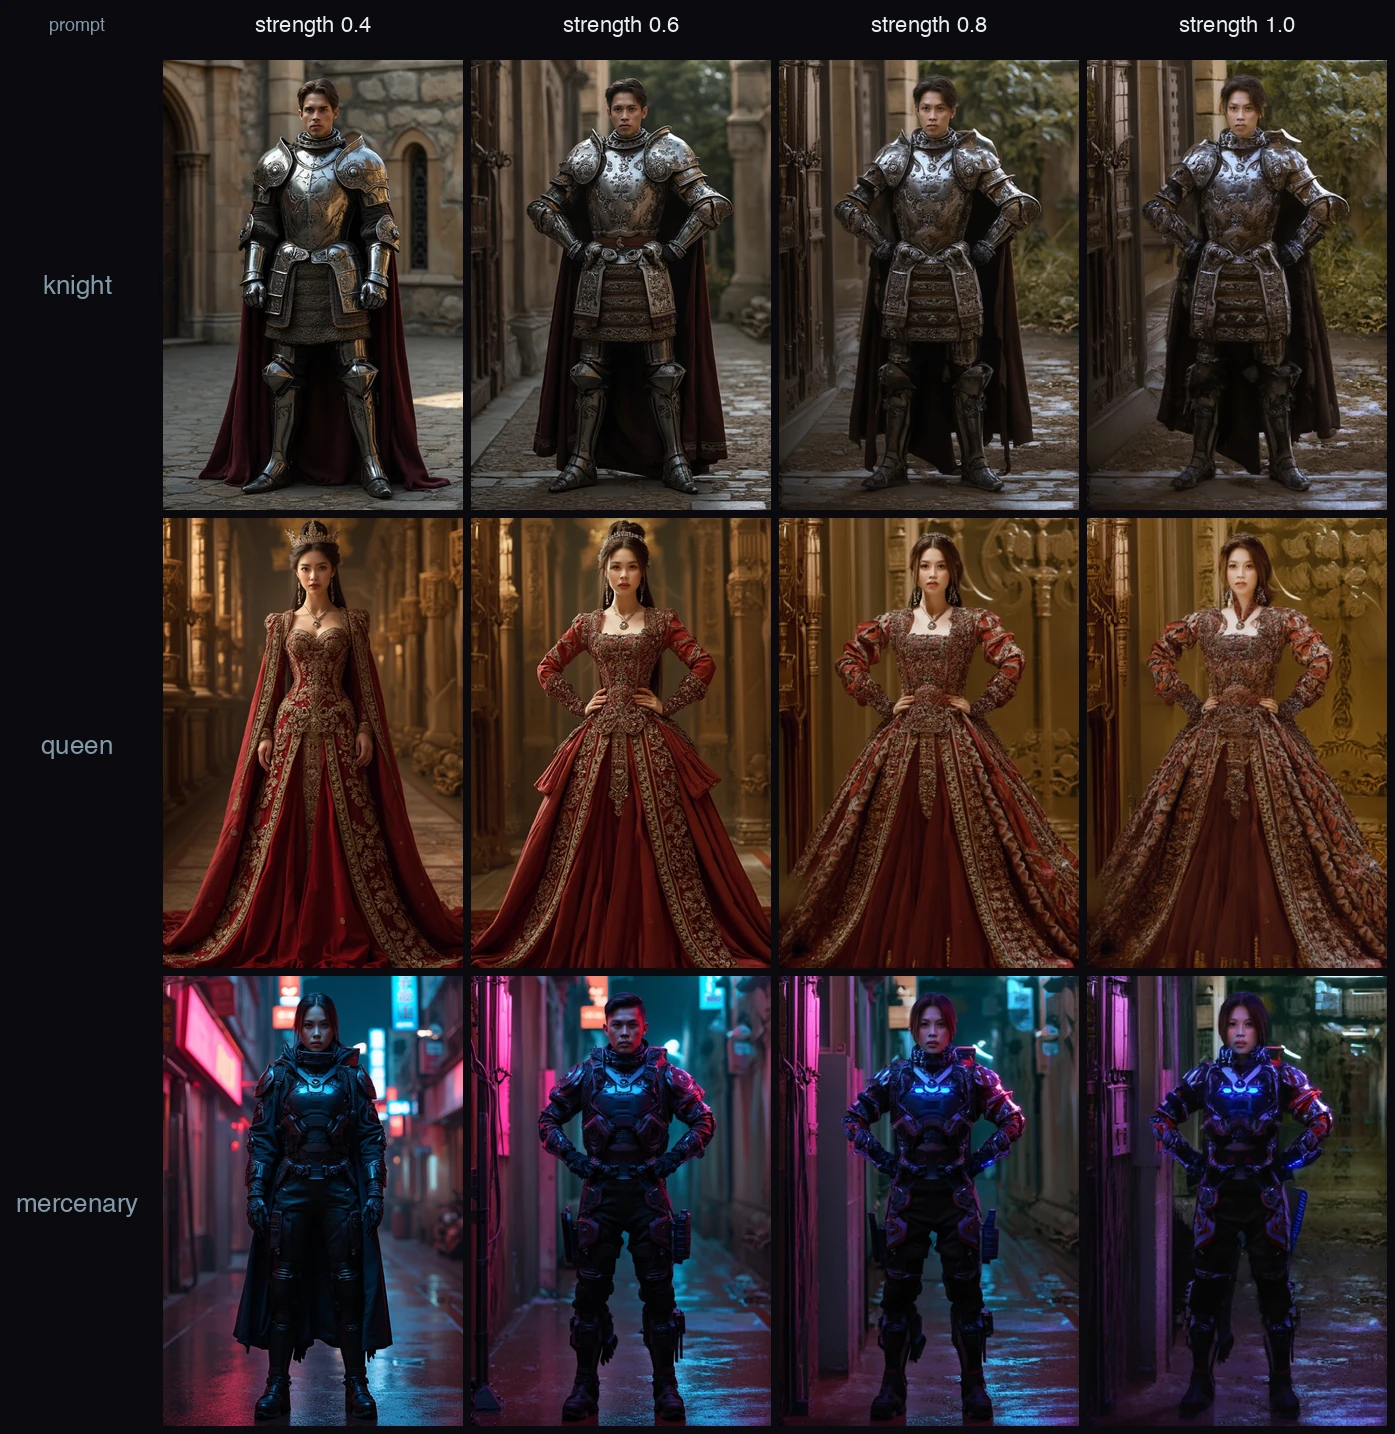
Read it left to right. At 0.4 the model mostly ignores the skeleton and the arms fall to the sides. By 0.6 every character locks to the hands-on-hips stance, and 0.8 holds it harder still. At 1.0 the pose is enforced most strictly, but the image starts to darken and oversaturate.
The exact number depends on the model. Older SD1.5 and SDXL OpenPose models usually want a weight near 1.0, while this Flux ControlNet lands best around 0.6 to 0.8. The habit is the same either way: if the pose is slipping, raise the weight; if the image looks overcooked, lower it.
Does OpenPose ControlNet work with Flux?
Yes, and it is worth knowing about, because Flux output is a clear step up from the older SD1.5 look. Every generated example in this post was made with a Flux ControlNet: the InstantX and Shakker Labs FLUX.1-dev ControlNet Union, which takes an OpenPose skeleton directly and conditions Flux on it.
The workflow is the same idea with one twist. You still feed it a skeleton, but you set the control type to pose and use a lower control strength (Flux ControlNets land best around 0.6 to 0.8, below the near-1.0 that SD1.5 and SDXL models want). The prompt still controls the character; the skeleton still fixes the stance.
One caveat: not every Flux ControlNet does pose. Several of the popular ones support only canny, depth, or soft edge. Confirm the model lists a pose or openpose control type before you count on it.
Why is my ControlNet OpenPose result ignoring the pose?
If the output ignores the skeleton, it is almost always one of four things, in rough order of likelihood:
- Model and base mismatch. An SD1.5 OpenPose model on an SDXL checkpoint (or the reverse) will do nothing. Match them.
- ControlNet is not actually enabled. Confirm Enable is checked and a model is selected, not just a preprocessor.
- Control weight too low. Raise it toward 1.0, and if the pose fades late in the image, extend the ending control step.
- A bad skeleton. If the preprocessor could not find a clean figure, it cannot condition on one. Use a clearer, full-body reference, or fix the joints by hand in an editor.
Turning on Pixel Perfect and matching the preprocessor resolution to your output resolution clears up most of the remaining cases. The prompt still controls identity and style once the pose lands, so tune the prompt and the pose separately: get the stance holding first, then dial in the character.
Pose control is the difference between hoping and directing
Prompting alone is a slot machine. You pull the lever and hope the composition comes up right. A pose skeleton takes composition off the wheel: you decide the stance, and the model fills in the character. That is the whole reason ControlNet matters. It turns image generation from something you gamble on into something you direct.
This post is one recipe. If it is useful, there are many more, one pose driving a whole character set, multi-person scenes, hands and faces with openpose_full, combining OpenPose with depth or line ControlNets. We are building those out.
And if you are past running it by hand, if you are trying to turn a workflow like this into a real product people can rely on, that is the harder half, and it is what we do. Directing a model in a notebook is one thing; making it dependable in production is another. If that is you, let's talk.
Frequently asked
What is OpenPose ControlNet?›OpenPose is a pose-detection system that reads a human figure and reduces it to a skeleton of keypoints (head, shoulders, elbows, wrists, hips, knees, ankles).
How do I use OpenPose with ControlNet?›Install the ControlNet extension (Automatic1111) or the ControlNet nodes and preprocessors (ComfyUI), and download an OpenPose ControlNet model that matches your base model.
Where do I download the OpenPose ControlNet model?›From Hugging Face. safetensors is a smaller half-precision variant.
What is the difference between the OpenPose preprocessor and the model?›They are two different things that work together. The preprocessor (also called the annotator) looks at your reference image and produces the skeleton: openpose gives the body, openpose_full adds hands and face, openpose_hand adds hands.
Why is my ControlNet OpenPose result ignoring the pose?›Usually one of four things. 0, or extend the ending control step); or the preprocessor failed to detect a clean skeleton (a clearer, full-body reference or a hand-edited pose fixes it).
What control weight should I use for OpenPose ControlNet?›Control weight, also called control strength, sets how strictly the skeleton is enforced.
Why are the hands distorted in my OpenPose ControlNet output?›A standard OpenPose body skeleton has no finger keypoints, so the model has to guess the hands, and poses where the hands clasp or overlap are the worst case and often come out melted.
Can I use OpenPose ControlNet with Flux?›Yes. 1-dev ControlNet Union, which accepts a pose control map directly and gives Flux-quality output.
How do I pose an OpenPose skeleton by hand?›Use an OpenPose editor to drag the joints into the pose you want, then feed that skeleton in with the preprocessor set to none, since a hand-drawn skeleton is already the control map.
Let’s build it together.
We turn clever prototypes into production systems people can rely on. If you’re building with agents and want a hand making it real, leave your email and we’ll be in touch.